How to send emails to a custom SMTP server using emailJs
Victor Bruce
Sat Nov 07 2020

EmailJs makes the entire process of sending messages to your email service(Gmail, Yahoo, etc.) or transactional service(Mailgun, Mailjet, Sendgrid, etc.) a breeze. In my previous post, “How to send emails using React through EmailJs”. I touched on how to send emails to personal services, specifically, Gmail. In this blog post, I will talk about how to send emails to a custom SMTP server using EmailJs.
In case you’re wondering what SMTP is, SMTP(Simple Messaging Transfer Protocol) is a communication protocol for electronic mail transmission (Wikipedia). Mail servers and other mail transfer agents use SMTP to send and receive mail messages.
Recently, I worked on a project built with React and hosted on HostGator. After creating a new email under the registered domain(info@mywebsite.com), I needed a way to send messages to the newly created email account via a contact form I built with React.
I was happy when I found out EmailJs supports SMTP-server because of their easy to understand documentation and API integration. In no time, I was able to complete the task of connecting a custom SMTP-server using EmailJs to a contact form. Hence, I decided to write a tutorial on the topic.
Below are the simple steps you will need to follow to connect your website form to a custom SMTP server and send emails using EmailJs service.
Step 1: Adding an Email Service(SMTP server)
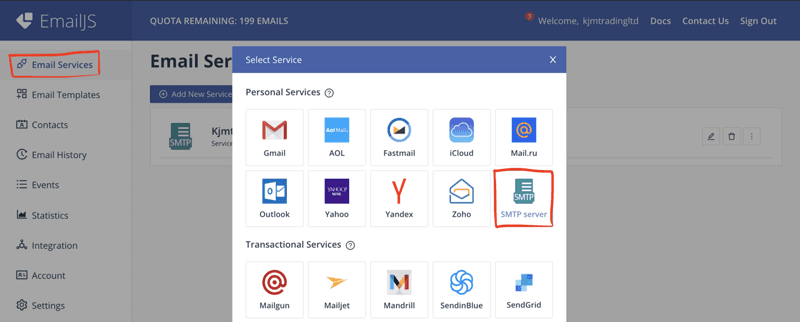
Assuming you have an account and have signed in to your dashboard. Click on the email services link on the left sidebar. You should see a button with the inscription Add Email Service. A pop-up modal will open, select the SMTP server as the preferred email service to add.
Step 2: Configuring the SMTP server
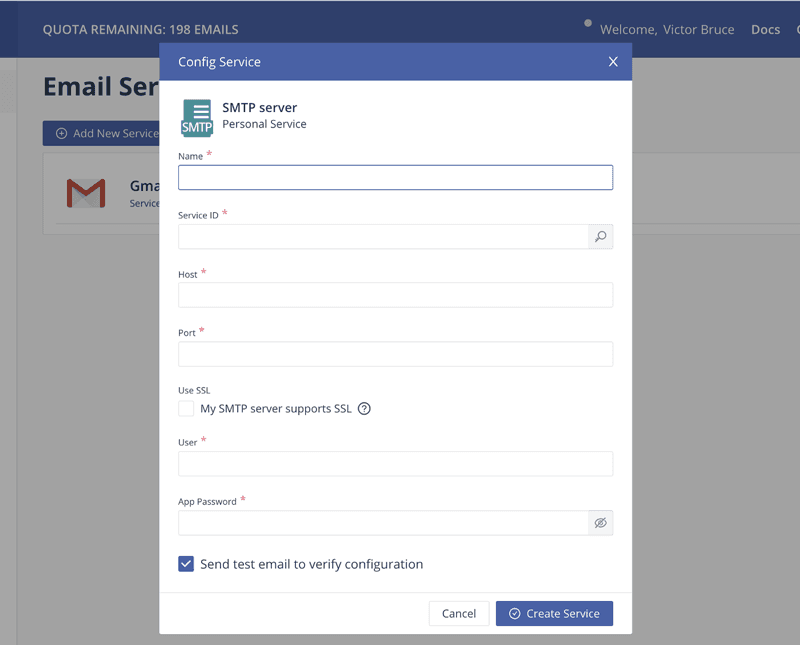
A pop-up config service form will appear. Fill the input fields with the appropriate values. This step is the most important of all hence ensuring that the information you are providing is accurate check your mail configuration settings file. In my case, HostGator sent a mail client configuration settings to my mail after creating it. If you’re using a different hosting platform, yours might be a little bit different. But the most important thing of all is that you should know what values to provide. Below is an explanation with examples of what each field should hold.
- Name: Provide a name for your SMTP server. For example mypersonalsite
- Service ID: The service ID could be anything meaningful. For example smtpmail
- Host: You can find this information from your hosting mail client configuration settings file. In my case, hostgator sent this information to me right after creating an email account under my domain. Mostly, it should be in this format:
mail.myemail.domainName.com. - Port: The number for your SMTP port is also contained in the mail client configuration settings file.
- User: The user name should be your email address. For example info@domainName.com
- App Password: Use the password to your email account here.
Lastly, don't forget to check the Use SSL option if your SMTP server supports SSL.
Note: I’m going to skip the step on how to create an EmailJs email template for your contact form. The reason being that I have a blog tutorial on EmailJs that goes into detail on how to create an email template.
Step 3: Connecting EmailJs to a React contact form.
Now, it’s time to connect EmailJs with our React contact form.
Install EmailJs via npm
npm i emailjs-comThe next step is to copy the sample code on how to connect EmailJs in a React app from their easy-to-read documentation.
import React from 'react';
import emailjs from 'emailjs-com';

export default function ContactUs() {

  function sendEmail(e) {
    e.preventDefault();

    emailjs.sendForm('YOUR_SERVICE_ID', 'YOUR_TEMPLATE_ID', e.target, 'YOUR_USER_ID')
      .then((result) => {
          console.log(result.text);
      }, (error) => {
          console.log(error.text);
      });
  }

  return (
    <form className="contact-form" onSubmit={sendEmail}>
      <input type="hidden" name="contact_number" />
      <label>Name</label>
      <input type="text" name="user_name" />
      <label>Email</label>
      <input type="email" name="user_email" />
      <label>Message</label>
      <textarea name="message" />
      <input type="submit" value="Send" />
    </form>
  );
}
Explanation of the code above.
The magic in this code happens in three places. The first one being the import emailjs from 'emailjs-com' statement. This piece of code is very important because it allows us to have access to methods to connect our contact form with EmailJs service.
Another important piece of code in the example above is the sendEmail function. This function is attached to the form element<form onSubmit={sendEmail}></form> . It is then triggered when the submit button on the form is clicked.
Lastly, within our sendEmail() function, we access the sendForm method from emailjs which we imported on line 2 . The emailjs.sendForm() takes in four(4) arguments.
- Service ID: In this blog tutorial, we used smtpmail.
- Template ID: On your dashboard, click on email templates. You will see a list of email template created. Copy the template id on the email template card.
- e.target: The values from the input fields.
- User ID: You can obtain your user id from the integration page by under API keys.
Also, thesendForm method returns a promise. A promise can either resolve or fail. Depending on the outcome, a message is displayed in the console of our browser in this example.
Note: You can be creative with how you output messages when the promise resovles or fails. It could be through alerts or pop-up messages.
That’s it, guys!. Thanks for sticking and staying around up till this point. You can send your feedback to me in the comments below.😉